(Added Hraesvelg to the bestiary) |
m (Reverted edits by 118.187.26.11 (talk | block) to last version by Zephyr135) Tag: mobileedit |
||
| (28 intermediate revisions by 10 users not shown) | |||
| Line 1: | Line 1: | ||
| − | [[Image:Fornstrand.png|600px]] |
+ | [[Image:Fornstrand.png|600px|center]] |
| ⚫ | |||
| ⚫ | |||
| ⚫ | |||
| + | <div style="float: left; margin-bottom: 10px; margin-left: 10px; margin-right: 10px">__TOC__</div> |
||
| + | |||
| ⚫ | |||
| + | |||
| ⚫ | |||
| + | |||
| ⚫ | |||
| − | [[Image:Fornstrand_starry_shore_grid.png|thumb|Starry Shore]] |
+ | [[Image:Fornstrand_starry_shore_grid.png|thumb|170px|Starry Shore]] |
| − | {|width=" |
+ | {|width="460px" class="standard location" |
!'''Navigation''' |
!'''Navigation''' |
||
!'''Position''' |
!'''Position''' |
||
| Line 46: | Line 50: | ||
Excavation Point |
Excavation Point |
||
| |
| |
||
| − | '''B-7 / J-4 / Q-4 / T-2''' |
+ | '''B-7 / I-4 / J-4 / K-7<br>L-2 / P-3 / Q-4 / T-2''' |
| |
| |
||
* [[Heirloom Pot]] |
* [[Heirloom Pot]] |
||
| Line 61: | Line 65: | ||
* [[Reprocessed Metal]] (50%) |
* [[Reprocessed Metal]] (50%) |
||
* [[Gold Ore]] (40%) |
* [[Gold Ore]] (40%) |
||
| − | <small>RARE ITEM:</small> [[Truesilver Ore]] |
+ | * <small>RARE ITEM:</small> [[Truesilver Ore]] |
|- |
|- |
||
| |
| |
||
| Line 70: | Line 74: | ||
* [[Coral]] (85%) |
* [[Coral]] (85%) |
||
* [[Magick Lamp]] (5%) |
* [[Magick Lamp]] (5%) |
||
| − | <small>RARE ITEM:</small> [[Truesilver Ore]] |
+ | * <small>RARE ITEM:</small> [[Truesilver Ore]] |
|} |
|} |
||
| Line 77: | Line 81: | ||
This lists all the monsters that appear in this location. You can get one of the first groups (both monsters listed for the group) together with one monster of the second - either one of the regulars or one of the rares. All rares at this location can be spawned without having to kill another rare first. |
This lists all the monsters that appear in this location. You can get one of the first groups (both monsters listed for the group) together with one monster of the second - either one of the regulars or one of the rares. All rares at this location can be spawned without having to kill another rare first. |
||
| + | '''XBOX Only Note:''' After downloading the DLC and the [[Eldritch Dragon]] appears, a glitch may occur where Seething Wind will spawn, even if you have defeated it. |
||
| ⚫ | |||
| + | |||
| ⚫ | |||
!'''Primary Regular Monsters''' |
!'''Primary Regular Monsters''' |
||
!'''Secondary Regular or Rare Monster''' |
!'''Secondary Regular or Rare Monster''' |
||
| Line 107: | Line 113: | ||
==Realm of the Sea Monster == |
==Realm of the Sea Monster == |
||
| ⚫ | |||
| − | |||
| ⚫ | |||
| ⚫ | |||
| ⚫ | |||
!'''Navigation''' |
!'''Navigation''' |
||
!'''Position''' |
!'''Position''' |
||
| Line 151: | Line 156: | ||
'''K-11''' |
'''K-11''' |
||
| |
| |
||
| − | * 5,200g |
+ | * '''5,200g''' |
| − | * [[Charm Recipes|Charm Recipe 6]] |
+ | * [[Charm Recipes#Recipe 6|Charm Recipe 6]] |
|- |
|- |
||
| |
| |
||
| Line 164: | Line 169: | ||
Excavation Point |
Excavation Point |
||
| |
| |
||
| − | ''' |
+ | '''H-5 / I-4 / K-3<br/>L-2 / L-8<br/>L-10 / M-8''' |
| |
| |
||
| − | * 5, |
+ | * '''5,587g''' |
| − | * [[Torn Scripture]] |
+ | * [[Torn Scripture]] (random) |
| − | * [[Faerie Herb]] |
+ | * [[Faerie Herb]] (random) |
| − | * [[Royal Platter]] |
+ | * [[Royal Platter]] (random) |
|- |
|- |
||
!'''Harvest Points''' |
!'''Harvest Points''' |
||
| Line 177: | Line 182: | ||
| |
| |
||
Diving Point |
Diving Point |
||
| − | <br /><small>Chance: [[Mr Diggs#Special Harvesting Effects| |
+ | <br /><small>Chance: [[Mr Diggs#Special Harvesting Effects|Angers Monsters]]</small> |
| |
| |
||
'''F-14''' |
'''F-14''' |
||
| Line 184: | Line 189: | ||
* [[Gold Ore]] (30%) |
* [[Gold Ore]] (30%) |
||
* [[Truesilver Ore]] (20%) |
* [[Truesilver Ore]] (20%) |
||
| − | <small>RARE ITEM:</small> [[Rough Mermaid Stone]] |
+ | * <small>RARE ITEM:</small> [[Rough Mermaid Stone]] |
|- |
|- |
||
| |
| |
||
| Line 193: | Line 198: | ||
* [[Coral]] (50%) |
* [[Coral]] (50%) |
||
* [[Reprocessed Metal]] (40%) |
* [[Reprocessed Metal]] (40%) |
||
| − | <small>RARE ITEM:</small> [[Truesilver Ore]] |
+ | * <small>RARE ITEM:</small> [[Truesilver Ore]] |
|- |
|- |
||
| |
| |
||
| Line 203: | Line 208: | ||
* [[Coral]] (20%) |
* [[Coral]] (20%) |
||
* [[Truesilver Ore]] (20%) |
* [[Truesilver Ore]] (20%) |
||
| − | <small>RARE ITEM:</small> [[Rough Boggart Stone]] |
+ | * <small>RARE ITEM:</small> [[Rough Boggart Stone]] |
|- |
|- |
||
| |
| |
||
Diving Point |
Diving Point |
||
| − | <br /><small>Chance: [[Mr Diggs#Special Harvesting Effects| |
+ | <br /><small>Chance: [[Mr Diggs#Special Harvesting Effects| Digs Restored]]</small> |
| |
| |
||
'''J-2''' |
'''J-2''' |
||
| Line 214: | Line 219: | ||
* [[Gold Ore]] (20%) |
* [[Gold Ore]] (20%) |
||
* [[Reprocessed Metal]] (20%) |
* [[Reprocessed Metal]] (20%) |
||
| − | <small>RARE ITEM:</small> [[Truesilver Ore]] |
+ | * <small>RARE ITEM:</small> [[Truesilver Ore]] |
|} |
|} |
||
<br /> |
<br /> |
||
'''Local Bestiary'''<br/> |
'''Local Bestiary'''<br/> |
||
| − | This lists all the monsters that appear in this location. You can get one of the |
+ | This lists all the monsters that appear in this location. You will always have Armorshells and can get one of the second group together with one monster of the third - either one of the regulars or one of the rares. All rares at this location can be spawned without having to kill another rare first. |
| − | {|width=" |
+ | {|width="100%" class="standard spawntable" |
!'''Primary Regular Monsters''' |
!'''Primary Regular Monsters''' |
||
| − | !'''Secondary Regular |
+ | !'''Secondary Regular Monsters''' |
| + | !'''Third Regular or Rare Monster''' |
||
|- |
|- |
||
| + | |rowspan="2"| |
||
| ⚫ | |||
| |
| |
||
| ⚫ | |||
*[[Vánargand]] |
*[[Vánargand]] |
||
| + | |rowspan="2"| |
||
| − | | |
||
*[[Bune]] |
*[[Bune]] |
||
*[[Manhunter]] |
*[[Manhunter]] |
||
*'''[[Narwhal]]''' (one-time) |
*'''[[Narwhal]]''' (one-time) |
||
*'''[[Orca]]''' (respawnable) |
*'''[[Orca]]''' (respawnable) |
||
| − | *'''[[Swiftmane]]''' |
+ | *'''[[Swiftmane]]''' (one-time) |
|- |
|- |
||
| |
| |
||
| − | *[[Armorshell]] ([[Giant Armorshell]]) |
||
*[[Wailing Larva]] |
*[[Wailing Larva]] |
||
| − | | |
||
| − | *[[Bune]] |
||
| − | *[[Manhunter]] |
||
| − | *'''[[Narwhal]]''' (one-time) |
||
| − | *'''[[Orca]]''' (respawnable) |
||
| − | *'''[[Swiftmane]]''' |
||
|} |
|} |
||
| + | |||
| + | <br/> |
||
| + | '''DLC Monster'''<br/> |
||
| + | The '''[[Eldritch Dragon]]''' will appear on the map once you [[Welcome to the Second Disk|have 18 party members]] and the [[Eye of the Dragon]] in your inventory. From then on he will be present until defeated. On the XBOX it prevents all other secondary or rare monsters from spawning. |
||
<br/> |
<br/> |
||
| Line 250: | Line 254: | ||
==The Cape of Delusion == |
==The Cape of Delusion == |
||
| − | [[Image:Fornstrand cape of delusion.png|thumb| |
+ | [[Image:Fornstrand cape of delusion.png|thumb|170px|The Cape of Delusion]] |
| − | {|width=" |
+ | {|width="460px" class="standard location" |
!'''Navigation''' |
!'''Navigation''' |
||
!'''Position''' |
!'''Position''' |
||
| Line 273: | Line 277: | ||
'''B-2 / A-4''' |
'''B-2 / A-4''' |
||
| |
| |
||
| − | * [[Weapon Recipes|Weapon Recipe 46]] |
+ | * [[Weapon Recipes#Recipe 46|Weapon Recipe 46]] |
|- |
|- |
||
| |
| |
||
| Line 282: | Line 286: | ||
* [[Ailanthus Branch]] (50%) |
* [[Ailanthus Branch]] (50%) |
||
* [[Orichalcum]] (40%) |
* [[Orichalcum]] (40%) |
||
| − | <small>RARE ITEM:</small> [[Rough Siren Stone]] |
+ | * <small>RARE ITEM:</small> [[Rough Siren Stone]] |
|} |
|} |
||
Revision as of 13:33, 14 April 2015

Strong winds and waves speed the erosion of this seaside cliff. The atmosphere of the area changes every few decades from calm to stormy. It is currently in a time of calm.
This location contains three areas. It is non-missable and unlocked by story events right after the second disk begins and cannot be visited earlier.
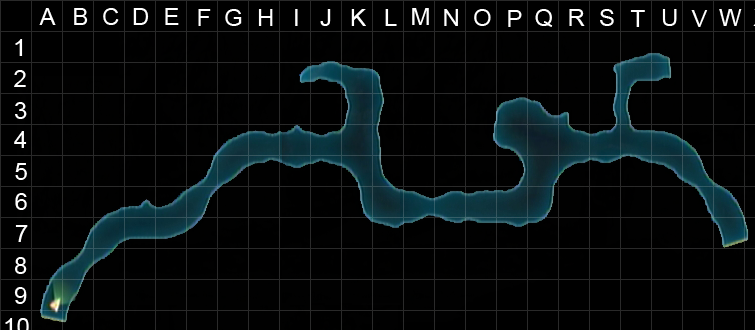
Starry Shore
Starry Shore
| Navigation | Position | Destination |
|---|---|---|
|
Exit |
A-10 |
|
|
Exit |
W-7 |
|
| Treasure | Position | Contains |
|
Treasure Chest |
I-2 |
|
|
Treasure Chest |
U-2 |
|
|
Excavation Point |
B-7 / I-4 / J-4 / K-7 |
|
| Harvest Points | Position | Contains |
|
Digging Point |
K-2 |
|
|
Diving Point |
Q-3 |
|
Local Bestiary
This lists all the monsters that appear in this location. You can get one of the first groups (both monsters listed for the group) together with one monster of the second - either one of the regulars or one of the rares. All rares at this location can be spawned without having to kill another rare first.
XBOX Only Note: After downloading the DLC and the Eldritch Dragon appears, a glitch may occur where Seething Wind will spawn, even if you have defeated it.
| Primary Regular Monsters | Secondary Regular or Rare Monster |
|---|---|
| |
|
Realm of the Sea Monster

Realm of Sea Monster
| Navigation | Position | Destination |
|---|---|---|
|
Transporter |
G-4 |
|
|
Exit |
A-11 |
|
|
Exit |
O-2 |
|
| Treasure | Position | Contains |
|
Treasure Chest |
J-17 |
|
|
Treasure Chest |
K-11 |
|
|
Excavation Point |
G-14 |
|
|
Excavation Point |
H-5 / I-4 / K-3 |
|
| Harvest Points | Position | Contains |
|
Diving Point
|
F-14 |
|
|
Diving Point |
H-17 |
|
|
Diving Point |
L-9 |
|
|
Diving Point
|
J-2 |
|
Local Bestiary
This lists all the monsters that appear in this location. You will always have Armorshells and can get one of the second group together with one monster of the third - either one of the regulars or one of the rares. All rares at this location can be spawned without having to kill another rare first.
| Primary Regular Monsters | Secondary Regular Monsters | Third Regular or Rare Monster |
|---|---|---|
DLC Monster
The Eldritch Dragon will appear on the map once you have 18 party members and the Eye of the Dragon in your inventory. From then on he will be present until defeated. On the XBOX it prevents all other secondary or rare monsters from spawning.
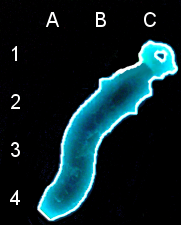
The Cape of Delusion

The Cape of Delusion
| Navigation | Position | Destination |
|---|---|---|
|
Exit |
A-4 |
|
| Treasure | Position | Contains |
|
Excavation Point |
B-2 / A-4 |
|
|
Jumping Point |
C-1 |
|
Local Bestiary
Always present:
One of the following can also be present:
- Clione (respawnable)
- Hairy Crab (respawnable)