Brokenstorm (talk | contribs) |
Tag: Visual edit |
||
| (29 intermediate revisions by 17 users not shown) | |||
| Line 1: | Line 1: | ||
| ⚫ | |||
| ⚫ | |||
| ⚫ | |||
| ⚫ | |||
| ⚫ | |||
| ⚫ | |||
| ⚫ | |||
| + | |||
| + | |||
| ⚫ | |||
| + | |||
| ⚫ | |||
| + | |||
| ⚫ | |||
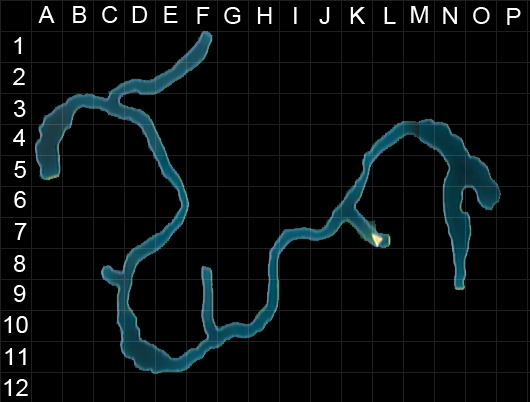
| − | [[Image:Blackdale_speckled_chasm_grid.png|thumb|Speckled Chasm]] |
+ | [[Image:Blackdale_speckled_chasm_grid.png|thumb|170px|The Speckled Chasm]] |
| − | {|width=" |
+ | {|width="460px" class="standard location" |
!'''Navigation''' |
!'''Navigation''' |
||
!'''Position''' |
!'''Position''' |
||
| Line 43: | Line 47: | ||
| |
| |
||
* [[Combat Francisca]] -1 |
* [[Combat Francisca]] -1 |
||
| − | * [[Weapon Recipes|Weapon Recipe 3]] |
+ | * [[Weapon Recipes#Recipe 3|Weapon Recipe 3]] |
|- |
|- |
||
| |
| |
||
| Line 59: | Line 63: | ||
'''O-6''' |
'''O-6''' |
||
| |
| |
||
| − | * 7,200g |
+ | * '''7,200g''' |
|- |
|- |
||
| |
| |
||
Excavation Point |
Excavation Point |
||
| |
| |
||
| − | '''E-5/D-10''' |
+ | '''E-5/D-2/D-4/F-1/D-10/N-6''' |
| |
| |
||
* [[Bone Fragment]] |
* [[Bone Fragment]] |
||
| Line 73: | Line 77: | ||
|- |
|- |
||
| |
| |
||
| − | Digging Point <br |
+ | Digging Point <br/><small>Chance: [[Mr. Diggs#Special Harvesting Effects|Angers Monsters]]</small> |
| |
| |
||
'''C-8''' |
'''C-8''' |
||
| |
| |
||
| − | * [[ |
+ | * [[Stone]] (70%) |
| − | * [[ |
+ | * [[Light Metal]] (20%) |
| − | * [[Natural Oil]] |
+ | * <small>RARE ITEM:</small> [[Natural Oil]] |
|- |
|- |
||
| |
| |
||
Digging Point |
Digging Point |
||
| − | <br/><small>Chance: Finds Nothing</small> |
||
| |
| |
||
'''F-8''' |
'''F-8''' |
||
| |
| |
||
| − | * [[Copper Ore]] |
+ | * [[Copper Ore]] (70%) |
| − | * [[Light Metal]] |
+ | * [[Light Metal]] (20%) |
| − | * [[Natural Oil]] |
+ | * <small>RARE ITEM:</small> [[Natural Oil]] |
|- |
|- |
||
| − | | |
+ | | |
Digging Point |
Digging Point |
||
| − | <br/><small>Chance: [[Mr. Diggs#Special Harvesting Effects| |
+ | <br/><small>Chance: [[Mr. Diggs#Special Harvesting Effects|Angers Monsters]]</small> |
| + | <br/><small>Chance: [[Mr. Diggs#Special Harvesting Effects|Digs -]]</small> |
||
| − | | |
+ | | |
'''O-5''' |
'''O-5''' |
||
| − | | |
+ | | |
| ⚫ | |||
| − | * (very often nothing) |
||
| ⚫ | |||
| ⚫ | |||
| − | * [[Voltaic Crystal]] (rare) |
||
|} |
|} |
||
| − | <br |
+ | <br/> |
| ⚫ | |||
| + | This lists all the monsters that appear in this location. You can get one of the first groups (both monsters listed for the group) together with one monster of the second - either one of the regulars or one of the rares. All rares at this location can be spawned without having to kill another rare first. |
||
| + | |||
| + | {|width="100%" class="standard spawntable" |
||
| ⚫ | |||
| + | !'''Secondary Regular or Rare Monster''' |
||
| ⚫ | |||
| ⚫ | |||
| ⚫ | |||
| ⚫ | |||
| + | | |
||
| ⚫ | |||
| ⚫ | |||
| ⚫ | |||
| ⚫ | |||
| + | |} |
||
| + | |||
| ⚫ | |||
==The Sapphire Pit== |
==The Sapphire Pit== |
||
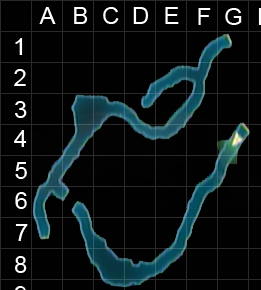
| − | [[Image:Blackdale_sapphire_pit_grid.png|thumb|Sapphire Pit]] |
+ | [[Image:Blackdale_sapphire_pit_grid.png|thumb|170px|The Sapphire Pit]] |
| − | {|width=" |
+ | {|width="460px" class="standard location" |
!'''Navigation''' |
!'''Navigation''' |
||
!'''Position''' |
!'''Position''' |
||
| Line 125: | Line 146: | ||
'''G-4''' |
'''G-4''' |
||
| |
| |
||
| − | * [[Blackdale#The |
+ | * [[Blackdale#The Obsidian Trail|The Obsidian Trail]] |
|- |
|- |
||
| |
| |
||
| Line 143: | Line 164: | ||
'''B-3''' |
'''B-3''' |
||
| |
| |
||
| − | * [[Blackdale Map 1]] |
+ | * [[:file:Blackdale_speckled_chasm_grid.png|Blackdale Map 1]] |
|- |
|- |
||
| |
| |
||
| Line 153: | Line 174: | ||
* [[Dull Sword]] x 2 |
* [[Dull Sword]] x 2 |
||
* [[Heroic Medal]] x 3 |
* [[Heroic Medal]] x 3 |
||
| − | * [[Weapon Recipes|Weapon Recipe 52]] |
+ | * [[Weapon Recipes#Recipe 52|Weapon Recipe 52]] |
|- |
|- |
||
| |
| |
||
| Line 165: | Line 186: | ||
Excavation Point |
Excavation Point |
||
| |
| |
||
| − | '''C-8 / F-6''' |
+ | '''C-8 / D-3<br/>D-8 / F-6''' |
| |
| |
||
| − | * [[Weapon Recipes|Weapon Recipe 4]] |
+ | * [[Weapon Recipes#Recipe 4|Weapon Recipe 4]] |
|- |
|- |
||
!'''Harvest Points''' |
!'''Harvest Points''' |
||
| Line 175: | Line 196: | ||
| |
| |
||
Digging Point |
Digging Point |
||
| − | <br/><small>Chance: Finds Nothing</small> |
||
| |
| |
||
'''C-3''' |
'''C-3''' |
||
| |
| |
||
| − | * [[ |
+ | * [[Gaslin Copper]] (80%) |
| − | * [[ |
+ | * [[Beastman Talon]] (10%) |
| − | * [[Natural Oil]] |
+ | * <small>RARE ITEM:</small> [[Natural Oil]] |
|- |
|- |
||
| |
| |
||
Digging Point |
Digging Point |
||
| − | <br/><small>Chance: [[Mr. Diggs#Special Harvesting Effects| |
+ | <br /><small>Chance: [[Mr. Diggs#Special Harvesting Effects|Digs Restored]]</small> |
| |
| |
||
'''G-4''' |
'''G-4''' |
||
| |
| |
||
| − | * [[Divine Dragonyte]] |
+ | * [[Divine Dragonyte]] (20%) |
| − | * [[ |
+ | * [[Voltaic Crystal]] (10%) |
| + | * <small>RARE ITEM:</small> [[Primordial Alloy]] |
||
| ⚫ | |||
|} |
|} |
||
| + | <br /> |
||
| + | '''Local Bestiary'''<br /> |
||
| + | This lists all the monsters that appear in this location. You can get one of the first groups (both monsters listed for the group) together with one monster of the second - either one of the regulars or one of the rares. All rares at this location can be spawned without having to kill another rare first. |
||
| + | |||
| + | {|width="100%" class="standard spawntable" |
||
| + | !'''Primary Regular Monsters''' |
||
| + | !'''Secondary Regular or Rare Monster''' |
||
| + | |- |
||
| + | | |
||
| + | *[[Skull Scavenger]] |
||
| + | *[[Spider]] ([[Giant Spider]]) |
||
| + | | |
||
| ⚫ | |||
| ⚫ | |||
| ⚫ | |||
| + | *'''[[Violet Leafhopper]]''' (respawnable) |
||
| + | |} |
||
<br /> |
<br /> |
||
| Line 199: | Line 236: | ||
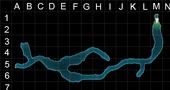
| − | [[Image:Blackdale_obisidan_trail_grid.png|thumb|Obsidian Trail]] |
+ | [[Image:Blackdale_obisidan_trail_grid.png|thumb|170px|The Obsidian Trail]] |
| − | {|width=" |
+ | {|width="460px" class="standard location" |
!'''Navigation''' |
!'''Navigation''' |
||
!'''Position''' |
!'''Position''' |
||
| Line 228: | Line 265: | ||
'''K-6''' |
'''K-6''' |
||
| |
| |
||
| − | * [[Blackdale Map 2]] |
+ | * [[:file:Blackdale_obisidan_trail_grid.png|Blackdale Map 2]] |
|- |
|- |
||
| |
| |
||
| Line 250: | Line 287: | ||
| |
| |
||
Digging Point |
Digging Point |
||
| − | <br/><small>Chance: Very Often Nothing</small> |
||
| |
| |
||
| − | '''I- |
+ | '''I-5''' |
| |
| |
||
| − | * [[ |
+ | * [[Divine Dragonyte]] (20%) |
| − | * [[ |
+ | * [[Voltaic Crystal]] (10%) |
| + | * <small>RARE ITEM:</small> [[Primordial Alloy]] |
||
|- |
|- |
||
| |
| |
||
| − | + | Sifting Point |
|
| − | <br/><small>Chance: Finds Nothing</small> |
||
| |
| |
||
'''A-3''' |
'''A-3''' |
||
| |
| |
||
| − | * [[ |
+ | * [[Rough Boggart Stone]] (20%) |
| − | * [[ |
+ | * [[Light Gas]] (10%) |
| − | * [[Torn Scripture]] |
+ | * <small>RARE ITEM:</small> [[Torn Scripture]] |
|} |
|} |
||
<br /> |
<br /> |
||
| + | '''Local Bestiary'''<br /> |
||
| + | This lists all the monsters that appear in this location. You can get one of the first groups (both monsters listed for the group) together with one monster of the second - either one of the regulars or one of the rares. All rares at this location can be spawned without having to kill another rare first. |
||
| + | {|width="100%" class="standard spawntable" |
||
| + | !'''Primary Regular Monsters''' |
||
| + | !'''Secondary Regular or Rare Monster''' |
||
| + | |- |
||
| + | | |
||
| + | *[[Imp]] |
||
| + | *[[Spider]] ([[Giant Spider]]) |
||
| + | | |
||
| + | *[[Skull Scavenger]] |
||
| ⚫ | |||
| + | *'''[[Violet Leafhopper]]''' (respawnable) |
||
| + | |} |
||
| + | <br /> |
||
==The Cuspate Post== |
==The Cuspate Post== |
||
| − | [[Image:Blackdale_cuspate_post_grid.png|thumb|Cuspate Post]] |
+ | [[Image:Blackdale_cuspate_post_grid.png|thumb|170px|The Cuspate Post]] |
| − | {|width=" |
+ | {|width="460px" class="standard location" |
!'''Navigation''' |
!'''Navigation''' |
||
!'''Position''' |
!'''Position''' |
||
| Line 308: | Line 359: | ||
Excavation Point |
Excavation Point |
||
| |
| |
||
| − | '''A-7''' |
+ | '''A-7 / A-9<br/>B-9 / C-7''' |
| |
| |
||
| − | * 75g |
+ | * '''75g''' |
|- |
|- |
||
!'''Harvest Points''' |
!'''Harvest Points''' |
||
| Line 318: | Line 369: | ||
| |
| |
||
Diving Point |
Diving Point |
||
| − | <br/><small>Chance: Finds Nothing</small> |
||
| |
| |
||
'''C-9''' |
'''C-9''' |
||
| |
| |
||
| − | * [[ |
+ | * [[Natural Oil]] (80%) |
| − | * [[ |
+ | * [[Mystic Fiend Bone]] (10%) |
| − | * [[Translucent Water]] |
+ | * <small>RARE ITEM:</small> [[Translucent Water]] |
|- |
|- |
||
| |
| |
||
Jumping Point |
Jumping Point |
||
| − | <br/><small>After removing the |
+ | <br/><small>After removing the<br/>Schiavona with the<br/>[[Tablet]]</small> |
| |
| |
||
'''B-8''' |
'''B-8''' |
||
| |
| |
||
| − | * [[ |
+ | * [[Voltaic Crystal]] (40%) |
| − | * [[ |
+ | * [[Rough Boggart Stone]] (30%) |
| − | * [[Ailanthus Branch]] |
+ | * [[Ailanthus Branch]] (20%) |
| − | * [[Rough Banshee Stone]] |
+ | *<small>RARE ITEM:</small> [[Rough Banshee Stone]] |
|} |
|} |
||
<br /> |
<br /> |
||
| + | '''Local Bestiary'''<br /> |
||
| + | This lists all the monsters that appear in this location. You can get one of the first groups (both monsters listed for the group) together with one monster of the second - either one of the regulars or one of the rares. All rares at this location can be spawned without having to kill another rare first. |
||
| + | {|width="100%" class="standard spawntable" |
||
| − | |||
| + | !'''Primary Regular Monsters''' |
||
| ⚫ | |||
| + | !'''Secondary Regular or Rare Monster''' |
||
| − | This lists all the monsters that appear in this location. |
||
| + | |- |
||
| − | ===Boss Monsters === |
||
| + | | |
||
| − | |||
| + | *[[Skull Scavenger]] |
||
| − | {|cellspacing="0" cellpadding="0" border="0" width="100%" |
||
| + | | |
||
| − | |width="33%" valign="top"| |
||
| − | * |
+ | *[[Feral Fang]] |
| + | *'''[[Firtoad]]''' (respawnable) |
||
| − | |width="33%" valign="top"| |
||
| ⚫ | |||
| − | |width="33%" valign="top"| |
||
|} |
|} |
||
| − | |||
<br /> |
<br /> |
||
| − | + | '''Boss Monsters''' |
|
| + | * [[Jager (Blackdale)|Jager]] (during the [[The Battle in Blackdale|story]]) |
||
| − | |||
| ⚫ | |||
| − | {|cellspacing="0" cellpadding="0" border="0" width="100%" |
||
| − | |width="33%" valign="top"| |
||
| ⚫ | |||
| ⚫ | |||
| − | |width="33%" valign="top"| |
||
| ⚫ | |||
| − | * [[Firtoad]] |
||
| − | |width="33%" valign="top"| |
||
| − | * [[Jade Golem]] |
||
| ⚫ | |||
| ⚫ | |||
| − | |||
| ⚫ | |||
| − | |||
| ⚫ | |||
| − | |||
| − | {|cellspacing="0" cellpadding="0" border="0" width="100%" |
||
| − | |width="33%" valign="top"| |
||
| ⚫ | |||
| ⚫ | |||
| − | |width="33%" valign="top"| |
||
| ⚫ | |||
| ⚫ | |||
| − | |width="33%" valign="top"| |
||
| ⚫ | |||
| ⚫ | |||
| ⚫ | |||
[[Category:Locations]] |
[[Category:Locations]] |
||
[[Category:Dungeons]] |
[[Category:Dungeons]] |
||
Revision as of 18:22, 13 March 2020
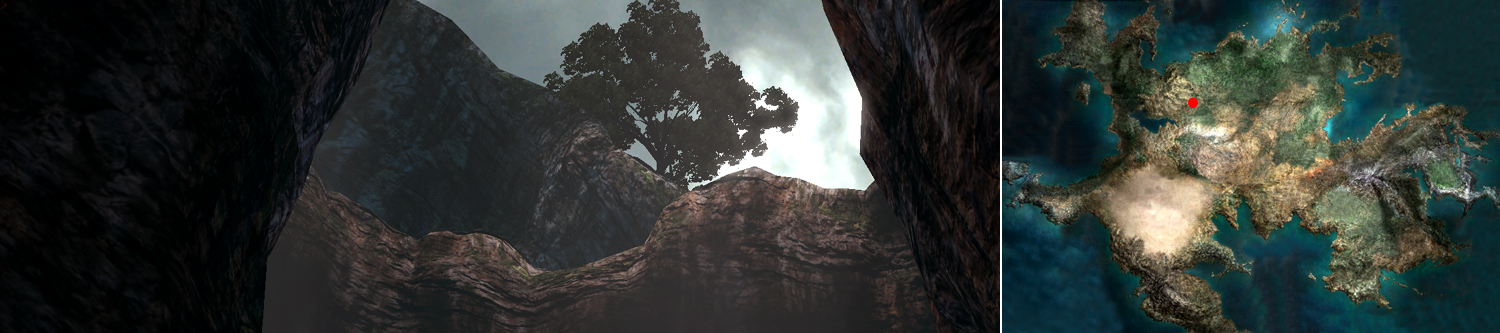
A network of caves that connects the torn earth of the region. As the caves steadily expand, so does the danger that the ground above may collapse at any time.
This location has four areas. It is non-missable, you have to visit it through the story. The Obisidan Trail is initially locked, but becomes available as soon as you finish the storyline events here.
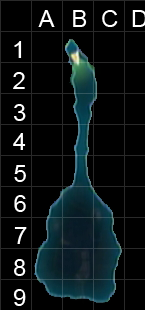
The Speckled Chasm
The Speckled Chasm
| Navigation | Position | Destination |
|---|---|---|
|
Exit |
L-7 |
|
|
Exit |
A-5 |
|
|
Exit |
N-9 |
|
| Treasure | Position | Contains |
|
Treasure Chest |
D-11 |
|
|
Treasure Chest |
F-1 |
|
|
Treasure Chest |
O-6 |
|
|
Excavation Point |
E-5/D-2/D-4/F-1/D-10/N-6 |
|
| Harvest Points | Position | Contains |
|
Digging Point |
C-8 |
|
|
Digging Point |
F-8 |
|
|
Digging Point
|
O-5 |
|
Local Bestiary
This lists all the monsters that appear in this location. You can get one of the first groups (both monsters listed for the group) together with one monster of the second - either one of the regulars or one of the rares. All rares at this location can be spawned without having to kill another rare first.
| Primary Regular Monsters | Secondary Regular or Rare Monster |
|---|---|
|
The Sapphire Pit
The Sapphire Pit
| Navigation | Position | Destination |
|---|---|---|
|
Exit |
G-1 |
|
|
Exit |
G-4 |
|
|
Exit |
A-7 |
|
| Treasure | Position | Contains |
|
Treasure Chest |
B-3 |
|
|
Treasure Chest |
C-7 |
|
|
Excavation Point |
B-3 |
|
|
Excavation Point |
C-8 / D-3 |
|
| Harvest Points | Position | Contains |
|
Digging Point |
C-3 |
|
|
Digging Point
|
G-4 |
|
Local Bestiary
This lists all the monsters that appear in this location. You can get one of the first groups (both monsters listed for the group) together with one monster of the second - either one of the regulars or one of the rares. All rares at this location can be spawned without having to kill another rare first.
| Primary Regular Monsters | Secondary Regular or Rare Monster |
|---|---|
|
The Obsidian Trail

The Obsidian Trail
| Navigation | Position | Destination |
|---|---|---|
|
Exit |
M-1 |
|
|
Exit |
A-5 |
|
| Treasure | Position | Contains |
|
Treasure Chest |
K-6 |
|
|
Treasure Chest |
B-3 |
|
|
Excavation Point |
H-4 / F-6 |
|
| Harvest Points | Position | Contains |
|
Digging Point |
I-5 |
|
|
Sifting Point |
A-3 |
|
Local Bestiary
This lists all the monsters that appear in this location. You can get one of the first groups (both monsters listed for the group) together with one monster of the second - either one of the regulars or one of the rares. All rares at this location can be spawned without having to kill another rare first.
| Primary Regular Monsters | Secondary Regular or Rare Monster |
|---|---|
|
The Cuspate Post
The Cuspate Post
| Navigation | Position | Destination |
|---|---|---|
|
Transporter |
B-2 |
|
|
Exit |
B-1 |
|
| Treasure | Position | Contains |
|
Special |
B-8 |
|
|
Excavation Point |
A-7 / A-9 |
|
| Harvest Points | Position | Contains |
|
Diving Point |
C-9 |
|
|
Jumping Point
|
B-8 |
|
Local Bestiary
This lists all the monsters that appear in this location. You can get one of the first groups (both monsters listed for the group) together with one monster of the second - either one of the regulars or one of the rares. All rares at this location can be spawned without having to kill another rare first.
| Primary Regular Monsters | Secondary Regular or Rare Monster |
|---|---|
|
Boss Monsters
- Jager (during the story)
- Fiery Idol (during the story)